www.bowemodels.com
Italeri joined the 1/32 Tornado club last year with this brand new original (for once) tooled kit. Until now only the venerable (and still pretty decent overall) Revell mould could give you a Tonka in this scale, and not a GR4 unless you did a bit of after market and/or scratch work. I've built the Revell kit a couple of times in the past and so with high expectations I unpacked this beauty to see how it compared.

The quality of the plastic is first rate as one would hope, a large number of parts as befits a large model like this and a photo etch sheet as well. The photo etch is not an option, several of the parts are integral to the model. However if you are looking for loadout options you will be disappointed. The configuration shown on the box top is pretty much all you get, other than the option to double up on the Sky Shadow or BOZ pods. And although I haven't researched it, I'm not sure this particular configuration is actually one you would find very often in the real world - certainly not for all of the aircraft represented by the kit schemes, but I may stand to be corrected on that. There are four markings schemes in the kit decals, including the rather nice 9 Sqn farewell scheme. As of the time of writing the after market in 1/32 GR4 decals is woefully underserved I can only hope this changes as options are limited. Indeed, the markings I required had to be cobbled together from kit, spares and self generation.
What also hits you fairly quickly when you first look at the plastic is the one and only major thing wrong with this kit - the panel lines. They are horrendously overdone. Revell actually got this more or less right on their version and they will certainly need no accenting on this Italeri kit. Indeed I did what I could to soften them in practice.
Again, at the time or building, there was little in terms of aftermarket enhancements available. I managed to get the Eduard photo etch sets for it pretty much the day they were released, likewise some Eduard resin wheels and the pitot and AoA probe set from Master, which is designed for the Revell kit but fits well enough. I also got my hands on the new Eduard "Space" 3D decal interior set (again, hot off the press) to see how that would go. There is a slight sense that Eduard rushed these sets out. They are not as comprehensive as Eduard tend to be, some of the enhancement possibilities usually found in such sets are missing which is a shame, however the underlying kit is pretty damn good and holds its own well enough so it's not the end of the world.
The kit builds beautifully, no other word for it. I will point out a few things to watch out for but don't let that detract from what is ultimately up there with the benchmark set by Tamiya for fit quality. Firstly, the instructions - although really nicely produced, can be a little vague in in parts about placement, and in a few places the illustrations don't always look quite like the parts which means you need to test fit and work a few things out for yourselves.

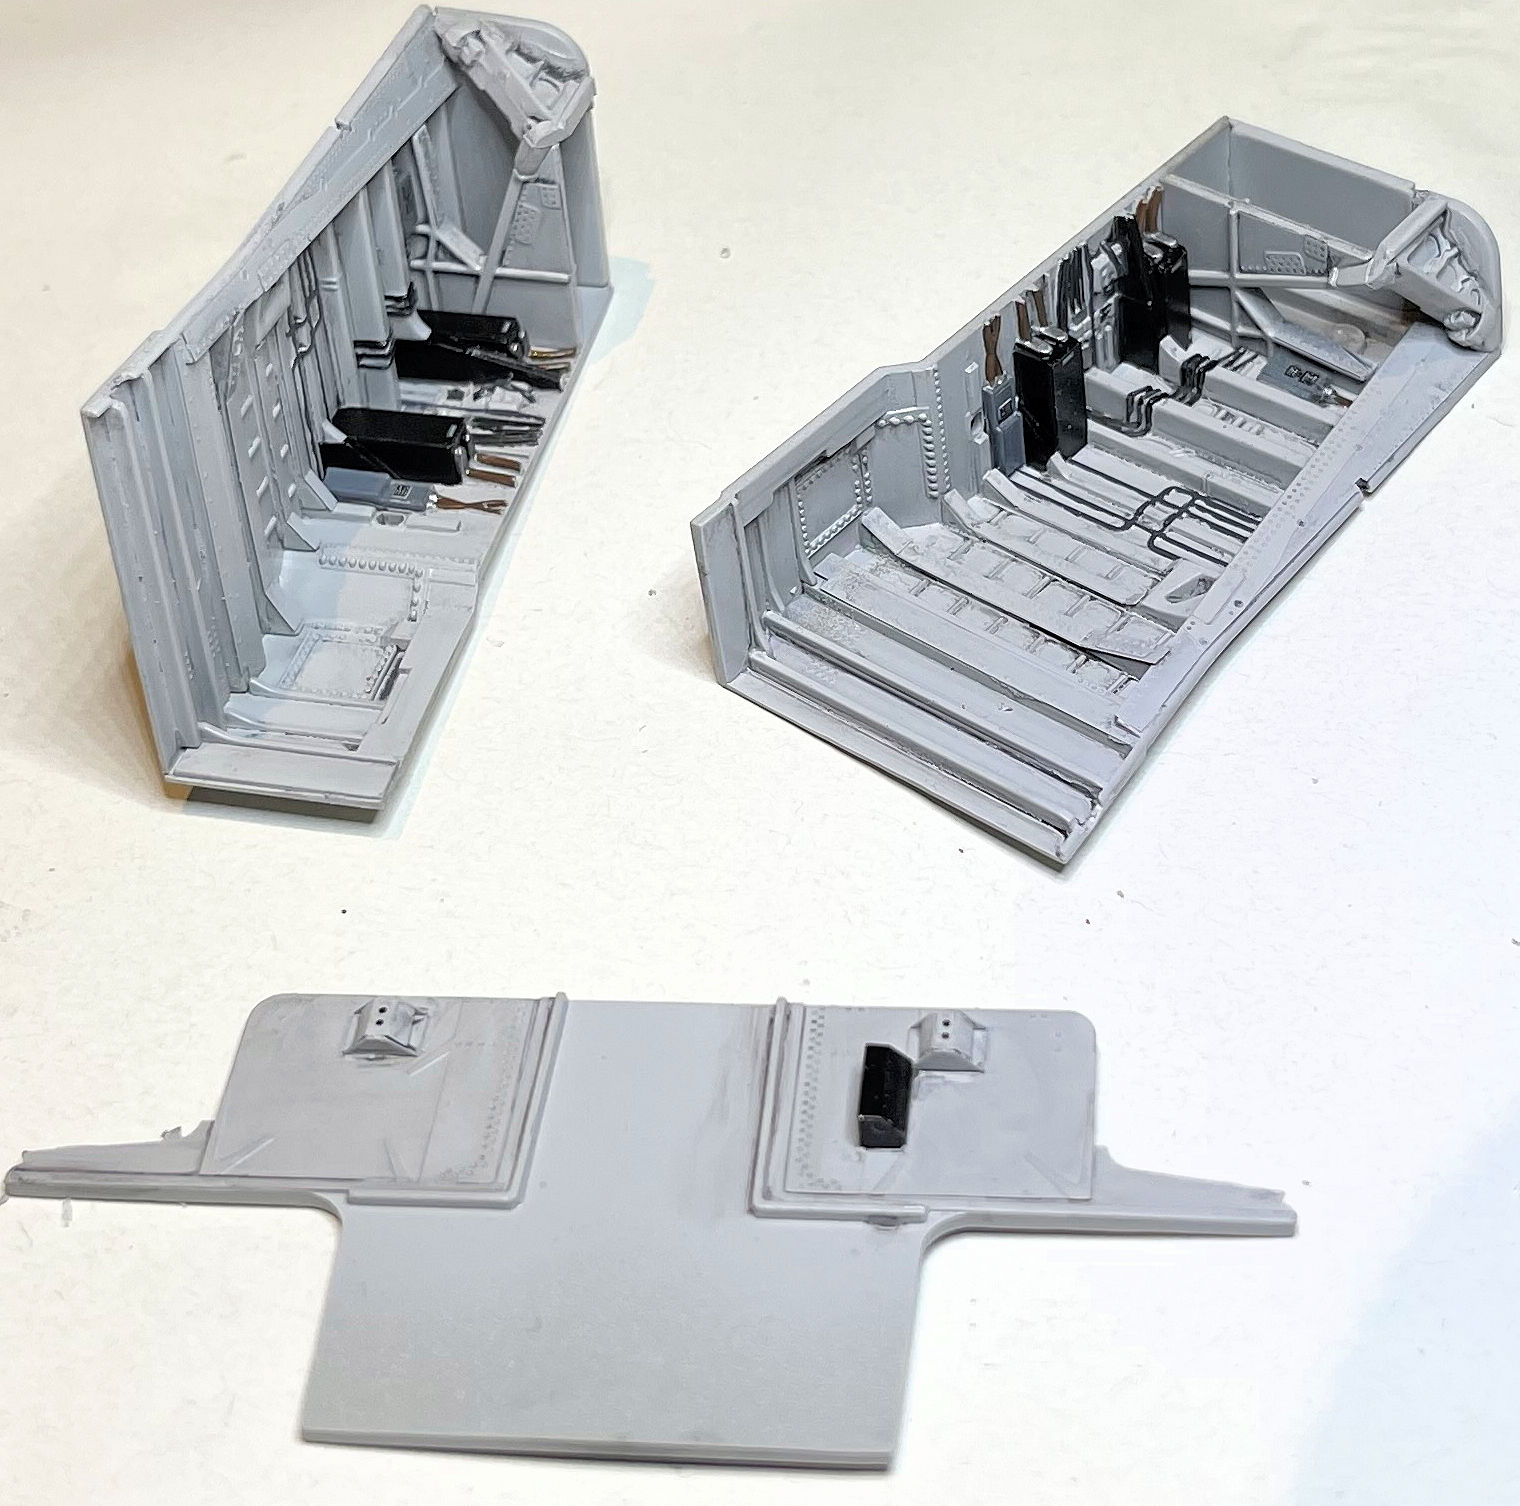
The cockpit detailing is one of the best I've seen in plastic. As mentioned, I used the Eduard Space set to replace much of it and it did feel a bit cruel to shave off the kit details as I had to. Carefully painted up, the raw kit cockpit would look more than good enough I reckon. But we modellers strive for detail that you just can't get from polystyrene. The Eduard Space set is good, love the raised detailing but it does suffer from the same problem as most Eduard coloured etch - whilst the detailing is lovely, the underlying colour resolution (ie panel colour) is terrible - and the colours themselves are questionable anyway. I don't know exactly the technology they use to paint these things but even a slightly close up view looks like it's come out of a 1970s dot matrix printer. For some time now, I have taken to overpainting (as best I can with a tiny brush) this underlying panel colours on this stuff and its fiddly and not always a precise science but it makes everything look so much better.
Otherwise, I added a bit of scratch detail and wiring to the cockpit (in this scale you are crazy and lazy not to) and also used resin seats from Quickboost. Again, meant for the Revell kit but they fit fine. The kit seats are good, although would benefit from some enhancements but I love resin seats you just can't get that level of realism any other way. There is no full resin cockpit out there as yet although I bet the boys at Aires are already working on it but nevertheless I'm happy that the kit parts, my "corrected" Eduard Space set, scratch work and careful painting have done the job.

The intake sections are quite complex and fiddly to get square - I can't remember building any Tornado kit where this wasn't the case to be honest, but be careful here. I had also been warned about the wing boots but personally I had no problems. Metal screws are provided to fix the wings on which is a good touch in this scale, although don't overtighten them (ask me how I know). Speaking of which, although there is the usual swing mechanism available, the kit is very obviously designed to be built wings forward. Swept back is possible but will mean a bit of messing around and you will lose the lovely flap and slat deployments which are definitely worth doing. If only because this is one area where Italeri give Revell a serious lesson in how to do this right. Anyone who has built the Revell 1/48 Tornado and tried to deploy the flaps will know exactly what I mean. The Italeri one is brilliantly designed, easy to build and looks great although my kit had some notable sink marks on the underside of the flaps which I didn't bother dealing with because they aren't really visible in normal operations.
This kit features the usual Tornado arrangement of front cockpit section built separately and slotted on to the main body. This particular operation I found rather tricky - to the point where you think it's not going to work, but it does, you just need to be a bit brave with flexing the assemblies.
The engines are nicely done with good details, and there is an option in the kit to display an engine out of the aircraft (including a nicely represented trolley) which is a thoughtful touch however not for me, just glued the bare minimum together and sealed up inside the fuselage. There are no after market engines or cans at the time of writing, but you know what, I don't think it needs them.
No metal undercarriage available either, which is something I usually like to go for especially in a model of this size. Partly for strength and also because they are much easier to align. Fortunately the kit undercarriage seems to work very well in both ways. Model seems solidly grounded and the legs aligned pretty well. However I would recommend a metal pin being introduced where the leg attaches to the main wheel bay frame. Just felt like it needed a little more than glue. The front leg is rather a complex part to build and this is one of the areas where the instructions aren't entirely clear so take care.

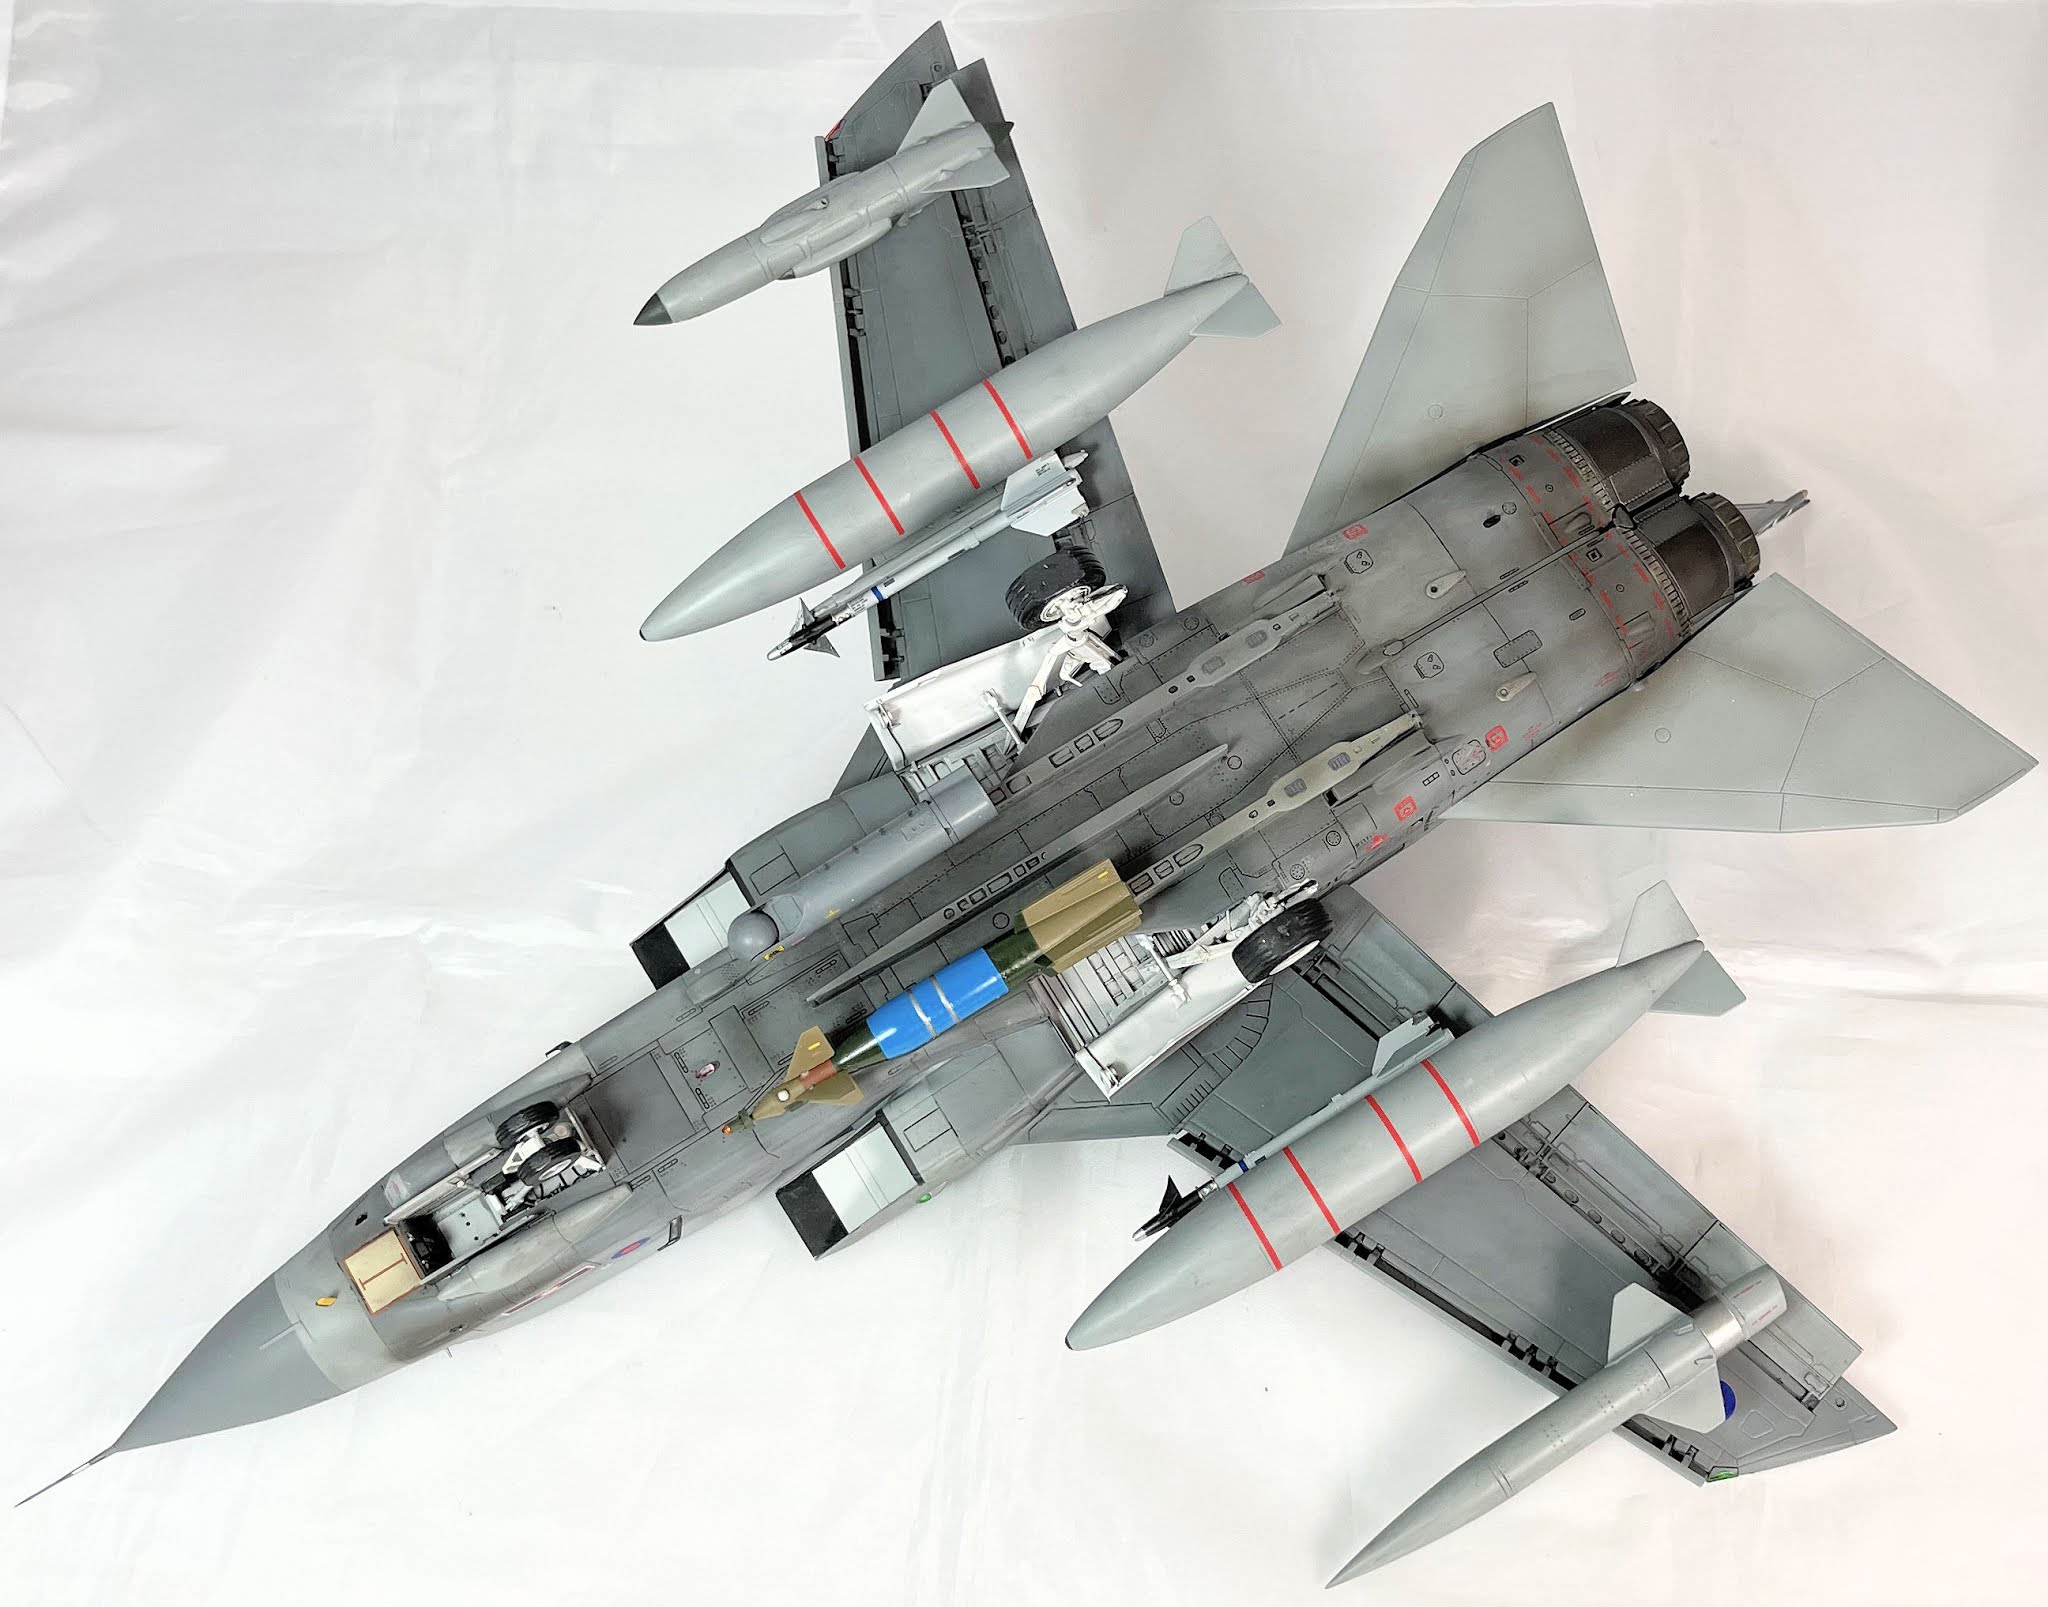
I was attempting to replicate a specific Tornado, ZA463 as she was in 2011. This meant the kit ordnance selection was not particularly helpful. I used the kit BOZ and Sky Shadow, they seemed pretty good with the exception that the small airflow blades on the BOZ as moulded are horrible and I replaced them with spare etch. The only tanks in the kit are a pair of the massive "Hindenburg" ones and I wanted the smaller 1500L two fin tanks for this project. The only place I could get them in the end was from a spare Revell GR1 kit. But needs must. I also needed a Litening pod which came courtesy of Eduard Brassin although their one has the air vent moulded to the right hand side. Given that it is almost always carried on the left this is unfortunate but some deft work with the hacksaw sorted this out. I also needed a training GBU, and the one carried by the life model is a CPU-123. The only one of these in 1/32 that accurately represents the side strip is from ResKit but whilst otherwise good, it has awful, thick and misshaped front fins. So I managed to find some correct fins from the leftover GBUs in my spare sprues cupboard and transplanted them.
ZA463 in 2011 was a bit of a Frankenstein machine, with a multitude of technicolour panels presumably as a result of patch ups etc. So painting her was a lot of "fun". But I did apply far more coats of gloss than I normally would, in an attempt to fill out the panel lines and I think it's worked to some extent. Some of the more prominent ones got individual treatment with micro filler. I used the kit decals where I could, fortunately one of the kit schemes is a 617 sqn aircraft of the same timeframe so the stencils worked, but most of the aircraft specific markings had to be self generated.

Weathering wise, ZA463 was at this point pretty grubby. I did wash the panel lines on the underside where Tonkas get particularly dirty, but was careful not to anywhere else - those lines need no enhancing, quite the opposite. I used oil paint rub on top of the matt coat to get the general grubbiness and some pastels for the really filthy bits. The tail staining was done with a combination of thinned paint and pastels.

So that's covered the main points of interest I think, I did add a handful of personal touches (e.g. canopy lower det cord humps and props to hold it open) but despite the few niggles mentioned I can't praise this kit highly enough. Ignore those panel lines and its near perfect. I haven't counted all the rivets (that's not what I do) and no doubt there are already people out there complaining about the shape of the nose because nobody is ever happy with the shape of the Tornado's nose for some reason (looks fine to me by the way). As an aside, the reason for this is that this aircraft features a fairly unique square to circle nose cone design which means the overall shape looks different from every angle. Modellers take note and stop complaining please. But I think it's pretty accurate overall, certainly looks the part to me and Revell, please note, the wings appear to be at the correct angle when forward in this one.
So better than Revell? No brainer. The Revell kit is a lot simpler but still makes a great model. I would have no qualms about building it again even now. However looking at the unused parts in the Italeri kit it's plain that a GR1 (or IDS if you prefer) is imminent and hopefully given the separate cockpit section an F3/ADV won't be far away either and we'll all be happy bunnies and the Revell kit may sadly slip into history. Just please do something about those panel lines...
Full photos of the finished article below, and you can see my full progress photos here.
Enjoy!