www.bowemodels.com
This commission came in 2024 from a customer whose great grandfather served on HMS Ibis and tragically died when she was sunk by an Italian torpedo off Algiers in 1942. I was a little cautious about taking it on at first, given that 1/350 is the largest ship scale I've attempted in the past. There is a kit from AJM of Ibis in 1/700 but that would not provide the imposing model required. So the best option was to start with another Black Swan class sloop and go from there. But as we shall see, not much of the original kit would remain in the finished model.
Deans Marine provide a pretty extensive range of ship kits in 1/96 scale, primarily aimed at the radio control market, and any criticism of the kit that follows (and there is some) should be seen within that context, ie the kit was not originally designed to produce a museum quality static model but something that could be buzzed around on the local boating pond. The kit itself consists of a fibre glass hull, several sheets of laser cut plastic for the superstructure, a handful of vac form parts and a fairly extensive number of moulded resin and metal details. However, my job was to turn it into a model to rival my other ship output and I knew from the outset that this was going to take some work.
 |
| Ibis - port view |
Amethyst (made famous through the Yangtse Incident in 1949) was one of the "modified" Black Swan class sloops that significantly updated the class specification from 1940 onwards, whereas the subject of this build, Ibis, was one of the originals. So my first task was some extensive research to identify what would need to be changed. To aid in my quest, I invested in the rather excellent book
"Black Swan Class Sloops" by Les Brown which contains fully detailed plans for a number of the original and modified class vessels and much other information.
 |
| Ibis - Starboard View |
Unfortunately, however, it doesn't cover Ibis which barely gets a mention. Indeed, there are only a handful of (rather grainy) photos of Ibis in existence (of which I now know pretty much every pixel). So, my complete reference for building Ibis consisted of 3 old photos, the instruction manual from the AJM kit (I suspect there is a fair bit of guesswork in that too) and a handful of attempts by other modellers to recreate her - likewise probably from fairly shaky references. But I also had detailed plans for Amethyst and a number of other Black Swan Sloops from the aforementioned book to use when in doubt, and with those in arm and a touch of educated guesswork and artistic licence I set forth on my mission.
 |
| Bracing the hull |
The first task was to prepare the fibreglass hull. The hull itself is probably the best part of the DM kit, very nicely moulded and fortunately without cut portholes, just "bumps". This was useful as the porthole layout for Amethyst is very different to Ibis so I sanded off the kit bumps and re-drilled. The hull also needed sanding down around the top to make it level and square and this was quite a task as fibreglass is not the nicest material to work with. I also had to alter the shape of the gunwhale "drop" as the kit part is too steep and short. It should be noted at this point that one of the differences between the early and "modified" black swans was that the beam was slightly larger on the modifieds (such as Amethyst). I calculated that this amounted to about 3.5mm out of 120mm so after much careful thought, planning, and considering all options - I decided not to worry about it.
 |
| Hull painted |
But given the size (the hull is almost a metre long) wooden braces were needed to stiffen everything up and a fair bit of work was needed on the kit deck pieces to get them to fit neatly. I will say at this point that the laser cut sheet pieces in the kit are not quite as square, consistent and well fitting as one may wish for in general, but much of it required replacing or modifying anyway. The whole hull also required a good scouring and priming before being painted. You will have seen that Ibis sported a rather "interesting" paint scheme unique to herself and this took quite some time to get right.
 |
Using plans from "Flamingo" to adjust
the kit plastic |
The DM kit provides a number of sheets of laser cut plastic from which the main superstructure elements are to be constructed. This is a bit of a shock to the system for a modeller used to injection moulded kits where it's largely already done for you, and it's not a particularly friendly way to put the housings together. But although it took some effort, in this instance it was beneficial since so much of the required structure for Ibis differed significantly from Amethyst and so this "IKEA" approach to building allowed me to effectively start from the ground up. By my reckoning, the closest plan I had to Ibis was "Flamingo" (although still some notable differences) and so this was where I went when in doubt.
 |
| Signal deck and bridge |
Not much of the cut plastic provided in the kit got through without heavy modification as a result, if it was used at all. I found myself scratch building a lot of parts from the edges of existing kit sheets or those of my own from stock. The forward signal deck area was one area that matched reasonably well (although not perfectly) but the bridge superstructure on Ibis differed considerably from Amethyst particularly at the rear and so I effectively threw away the Amethyst plans and built it up from scratch. The rear deck structure broadly followed Amethyst's shape but the Bofors platform, searchlight platform and galley house were all built from scratch.
 |
| Main superstructure elements all constructed |
The funnel came directly from the vac form sheets provided by DM, but another key feature of Ibis (and other earlier Black Swans) compared with Amethyst was the foremast. The modifieds all had a lattice mast and this is provided in photo etch form in the DM kit. However Ibis et al all carried the earlier style (and taller) tripod mast. This, I scratch built from brass rods. And so now all main superstructure elements were done, albeit in carcass form.
 |
| Planking added to the decks |
Now it was time to start on some details. The next command decision that needed to be made was whether Ibis had wooden decking. Pretty much impossible to determine, but the decision was made easy by my customer deciding that he would like it anyway. So I managed to get hold of some 3mm strips of veneer from the ever helpful
Cornwall Model Boats designed for this very purpose. I chopped them up into 3cm lengths and yes, I spent much tedious time gluing each one individually down to create the decking. Extremely mind numbing work but the end result is, I hope you agree, worth it.
 |
Two of the DM kit doors vs
my scratch built replacements. |
The next detail I wished to add were the superstructure doors and this is probably the time to address, and get out of the way, the biggest elephant in the room with regard to the DM kit. The quality of the resin castings provided that cover many of the desired ships details and fittings is just awful. Sorry, but there it is. The problem is not their design, which on the whole looks reasonably well executed, it's just they literally full of holes (bubbles) and extremely rough. Also the resin itself is weirdly sticky and unpleasant to work with. The doors are a prime example and I ended up scratch building my own from plasticard and spare photo etch. Indeed the same happened for the vast majority of the castings that I would have liked to use. Very few DM castings made it into the final model and those that did are full of filler and sanded to death. The photo etch provided by DM is, however, pretty decent. And although I had to purchase an extra sheet to cover what I needed, their railings were used throughout.
Once I had added the doors and a handful of other details, it was time to paint up the superstructure and fix it permanently in place. This was a surprisingly tricky and frustrating business, getting the "interesting" camouflage pattern to line up properly and match the reference photos as closely as possible. But after a bit of trial and error and a few "repaints" here and there I got it to within an acceptable state.
I decided next to tackle the main 4 inch guns. DM provide vac form gun housings, resin mounts and cast metal barrels. The barrels were just about usable, although they needed a lot of cleaning up. The mounts were not good at all, but I decided to tidy them up as best I could and use them because they aren't very visible inside the housings. The housings are OK, possibly a little too rounded but close enough, but they did need a bit of "dressing up" in order to get a reasonable level of visible detail and authenticity. Once painted up and installed Ibis started to take on her true character so this was a fairly pleasing stage.
 |
My scratch built quad pom pom alongside
the abandoned Battlecraft resin octuple. |
With the main guns done, if you will indulge me, the next bit of the project was my proudest moment of this whole build. Uniquely amongst her class (as far as I can tell), Ibis featured a quad pom pom on the stern deck. I knew this when I took the project on, and had my eye on procuring one in 1/96 from Shapeways Marketplace. Many of you will know what happened there! Shapeways went belly up just as I wanted to place my order. Hours of searching yielded no alternative from anywhere. So I took the brave (for me) decision to scratch build my own. Historically I have always avoided scratch building other than for very simple pieces, which a quad pom pom is not. I'd much rather pay for somebody else's efforts. I even purchased a resin octuple pom pom in 1/96 from Battlecraft in the hope it could be modified. But it didn't take long to decide that was beyond hope. But necessity combined with a new found zeal for testing out my scratch work (brought on by this project) forced my hand and I rummaged in my drawers for bits of spare plastic, etch and rod, and a couple of late night sessions later I had something I was genuinely proud of. Simple pleasures. Although I am now seriously considering joining the herd and investing in a 3D printer which would have been the logical solution.
 |
Scratch built gun director
and DM resin version |
 |
| Depth charge work |
More scratch building to come. The cast metal DM depth charge racks were just about salvageable with a bit of effort, but the depth charges themselves had to be replaced with scratch built versions from plastic tubing. Likewise the throwers were provided as cast metal, which I did use but their cradles were wrecked and they needed platforms so I fixed all that with etch and plastic. Similarly, the gun director resin supplied by DM was "tired and emotional" and also not suitable for Ibis anyway (didn't look quite right for Amethyst either to be honest). So more scratch work using my new found skills!
 |
| Main searchlight |
 |
| Aerial support frame |
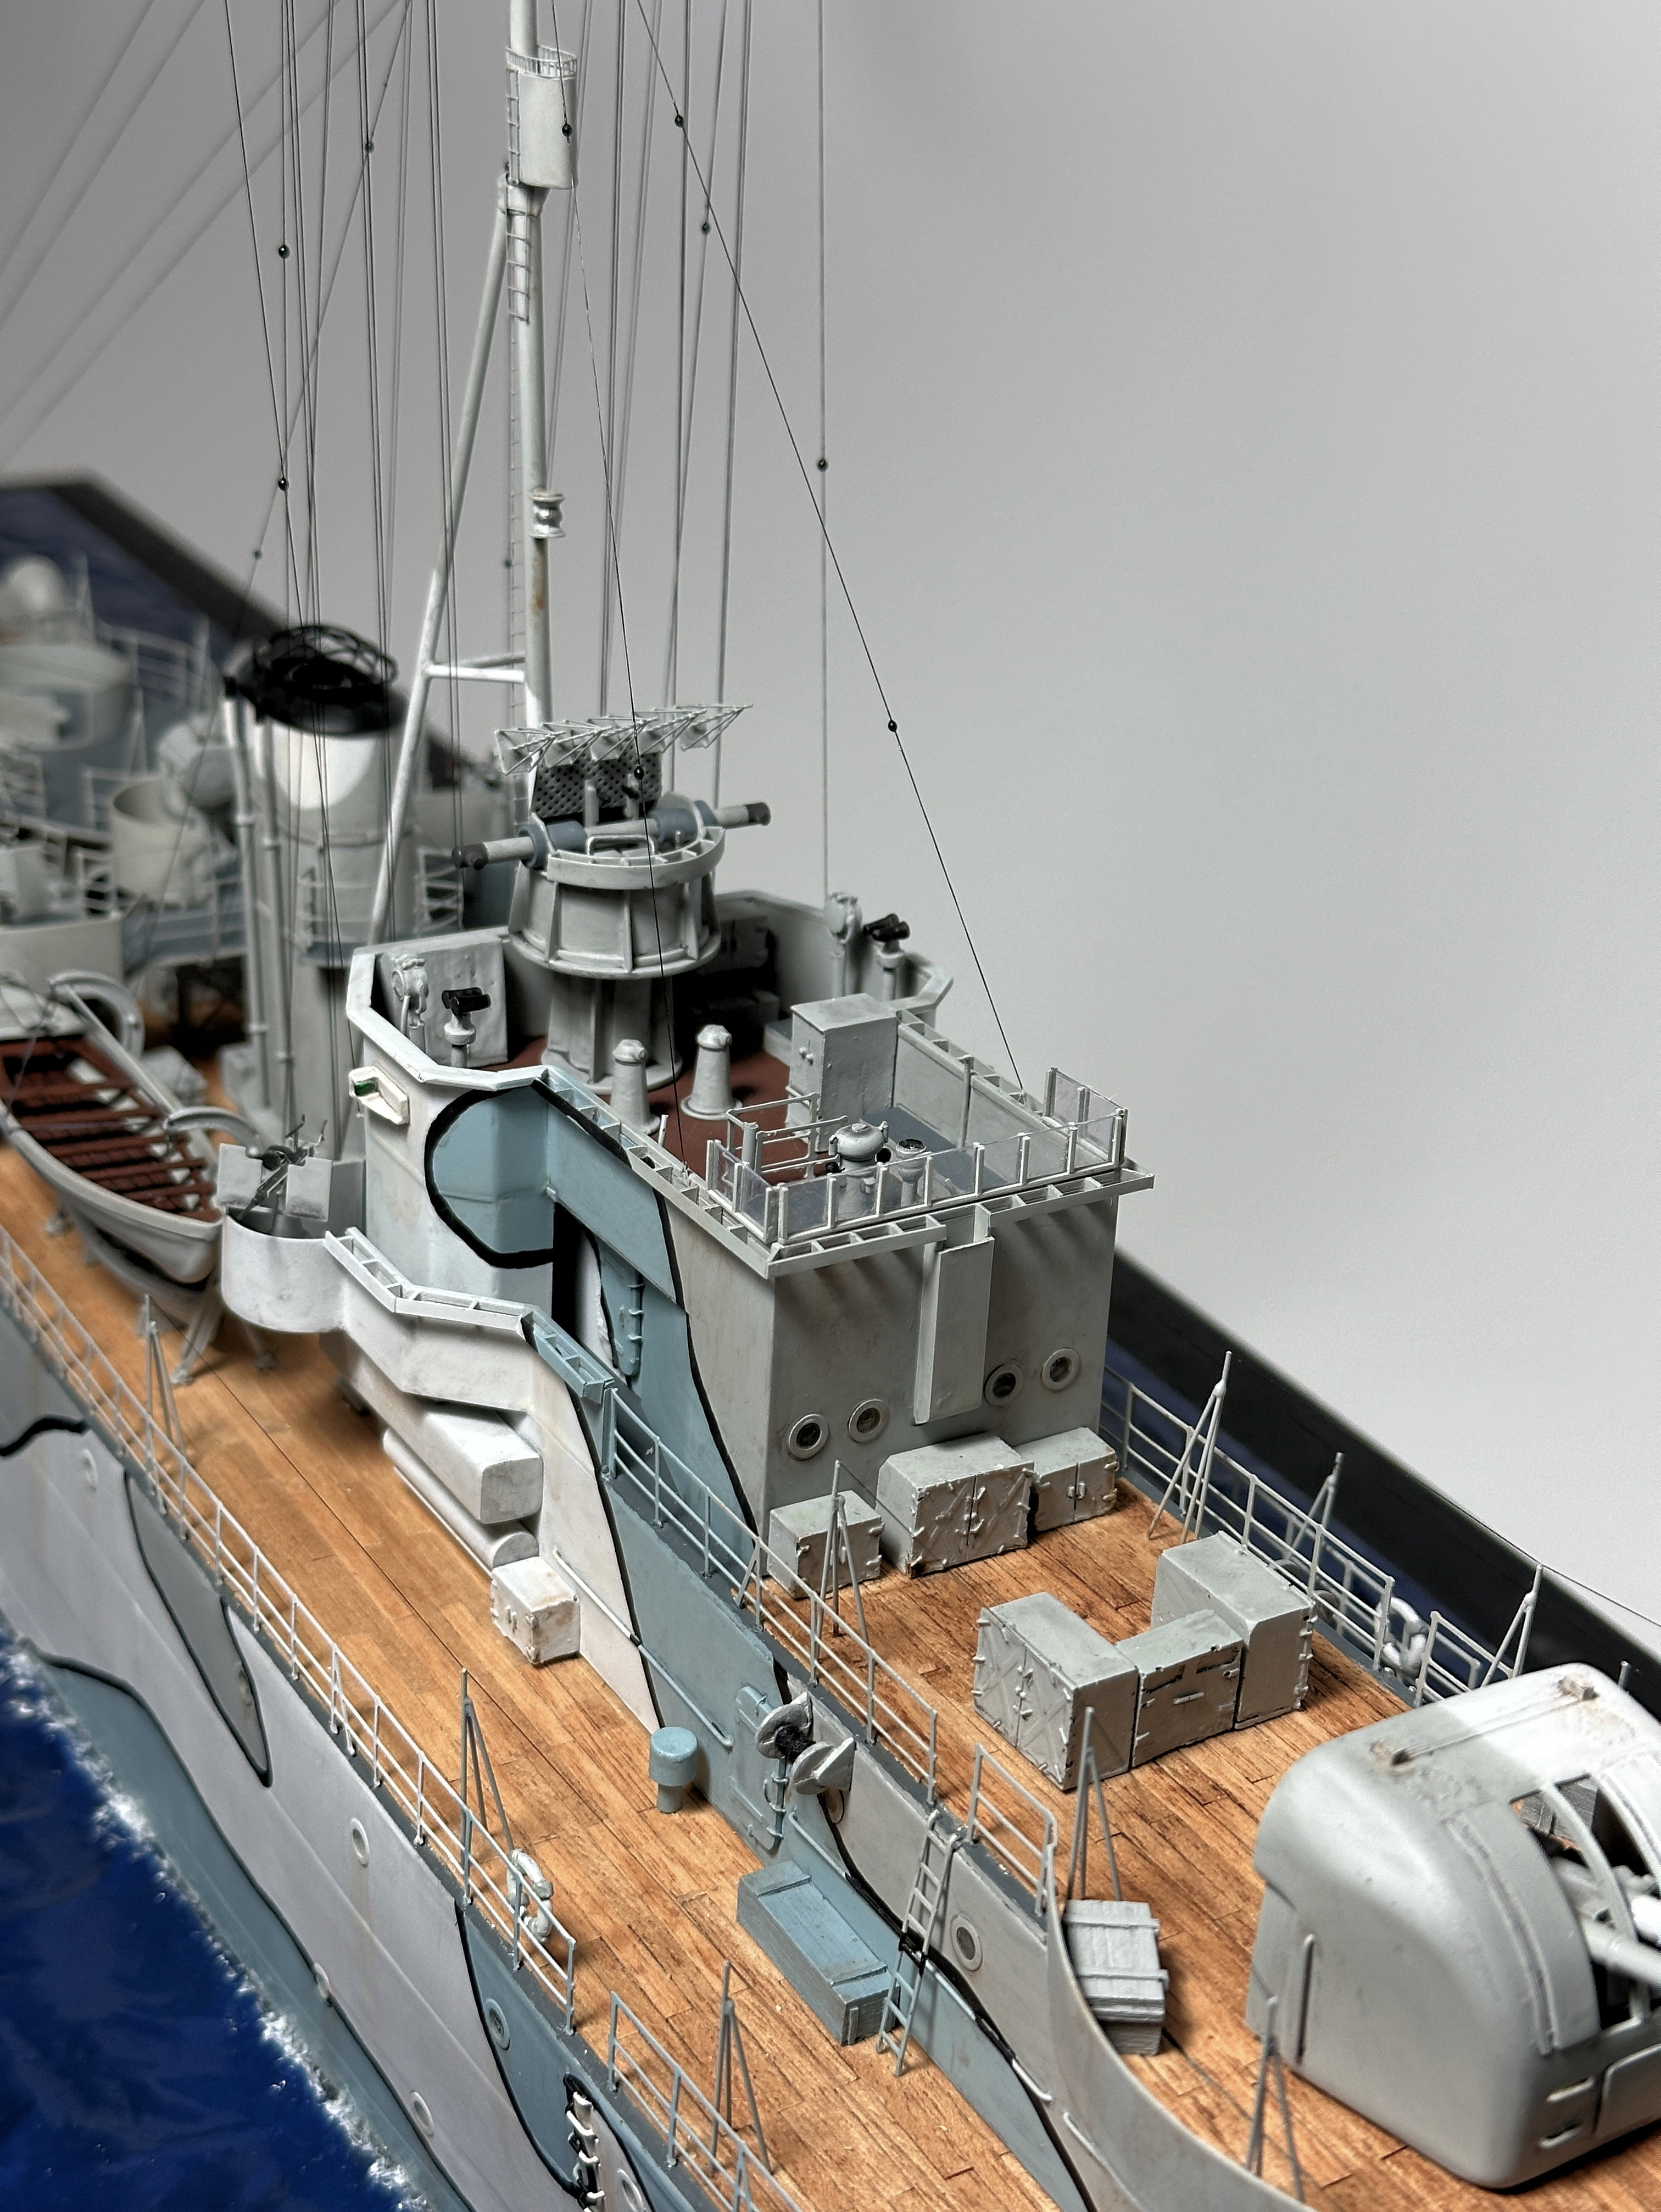
After I had fixed the main deck railings in place she was really starting to look the part. Not far to go now. Ibis didn't have a main mast as such, just a rather unusual looking aerial support frame which I scratch built from plastic rods. I also invested in a set of brass Oelikons from
RB Model, which are cheap and excellent. OK, they are 1/100 scale but you wouldn't know if I hadn't said that. DM provided a couple in the kit but, guess what, not up to my exacting standards! I also scratch built the main searchlight. DM provided a couple of small ones which worked fine for the bridge but Ibis needed a big 36" job so out came the spares drawer again. Fixing up and painting the whalers, Carley's and dinghies took a little more effort than I had anticipated, especially getting everything to fit correctly on the deck. And to add some interest and detail to the railing section, I scratch built about 55 awning stanchions and sprayed them around the decks. Many modellers don't bother with them but I think they do add a lot of interest to a model, especially in this large scale. Finally, in terms of fittings, the anchors, chains and winch (one of the DM castings that was almost OK) went on the bow. Also the many lockers, bridge furniture, voice pipes and similar bits and pieces were put in place, salvaging from the DM castings where possible, but scratch building for the most part.
 |
| Paper ensign |
I then spent a fair bit of time weathering the model. Multiple techniques were used, but my main efforts were to add some streaking and rust drips (done with pastels and oil washes) around the hull and superstructure sides, and also to make sure all the detail got a good grime wash to bring it out. And the last major task was the rigging. I've always dreaded that process in ship modelling. Not only is it very fiddly but often you have to use your own initiative and educated guesswork as to where all the wires go as references are usually not clear enough. But I have to say in 1/96 scale the actual task is rather less fiddly than in the smaller scales. I used Infini nylon rigging throughout, and a slightly thinner gauge for the flag lines. I also made up an ensign for the stern staff from paper. You can bang on as much as you like about using "real fabric" flags etc but in scale I've always found good old paper is easiest, glued in two layers it can be rumpled in the wind and to my eye looks as good as you will get.
And so I think I've pretty much covered the main points of this epic project - there was, of course, much involved that I haven't bothered to bore you with but what is above are the main points of interest. It took about 6 months overall, but I should point out that it was very much a background project for most of the time whilst I worked on other models. This has been unlike anything I've attempted before, both in terms of it's scale, difficulty of reference, and sheer amount of scratch work and modification. But all the more satisfying as a result. An achievement I shall be pleased to look back on for many years to come. I hope you enjoy the photos of the finished article below.
As a postscript, let me say the following. I may appear to have been fairly critical about some aspects of the Deans Marine Amethyst kit in this article. DM provide a comprehensive range of large scale kits primarily directed at the radio control market, not the critical eye of a neurotic static showpiece modeller such as myself who is used to having everything "just so" ready to put together. So whilst I would urge them to achieve a quick win by looking at the quality control of their castings, otherwise they very successfully fill a popular niche in the modelling industry and I commend them for it. This project could not have been accomplished without their efforts.
You can see the full set of progress photos
here.