In this world of modelling the sleek and sexy lines of Spitfires and Phantoms, it is very rewarding every now and then to get to grips with something a little more traditional. The Avro Anson is a pre war design that wins no beauty contests, but was a spectacularly successful aircraft in its class. More were built over its lifetime than were Lancasters. It also oozes charm as a model. So it was with some excitement that I accepted a commission to build one.
To build one in 1/48 scale, there is only one choice, the Classic Airframes kit. I have had a love/hate relationship with C.A. for many years. They are very often the only choice for specific aircraft but the kits are for experienced modellers only. This one is no exception. The large pieces are moulded in "limited run" style soft plastic and all other components are in resin. I am not a great fan of resin used in this way. It is always good for detailing kits with cockpits, seats and such as an "add on" but the majority of the resin parts in this kit could have been perfectly well moulded in plastic with no loss of detail. Also without the hassle of detaching them from mould plugs and their incredibly brittle nature (which would haunt me in this build). But that aside. the plastic exhibits a good level of detail on the fuselage and wings and dry fitting showed that the fit would be pretty good.

So I started with the cockpit which in this aircraft is quite an undertaking. The internal details are quite extensive and will be very visible so need taking time over. The plastic floor piece was sprayed interior green and I proceeded to add the side walls, seats, tables, and other details. The instrument panels are provided as photo etch parts over film dials which work very well. However the instructions are very vague and a bit of educated guesswork and trial and error is needed to get everything together correctly. A number of the spars (which are provided as resin) promptly broke when being detached from their plugs and had to be replaced with styrene rods (which they should have been in the first place IMHO). Seat belts are also provided as etch pieces which is a nice (and often overlooked) touch. A bit of dry brushing and an oil wash brought out the details nicely.

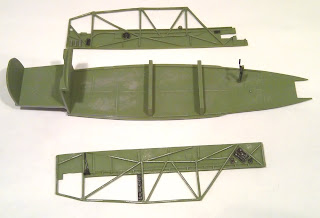
The framework around the interior (which is a very important part of the look of this plane) is provided as a highly delicate resin structure. I managed to detach the side pieces successfully without breakage and clean them up but the top structure was missing from the kit altogether. This has not happened to be since the old Airfix days! I rebuilt it using styrene rods which was probably a good thing.
The whole structure fitted rather well into the fuselage although I had to shave the front part of the floor on both sides to get the fuselage to close up correctly. After a few more etch and resin panels the fuselage went together. There are some locating pins but they are very primitive and almost useless so I added some lugs to help ensure a clean fit. Eventually everything lines up and the fuselage went together, and I taped it up securely and left it to dry thoroughly. A fair bit of filler was needed to get things smooth.
While drying, I masked up the extensive canopy sections using the Eduard mask set. This is not the sort of model that you want to have to mask up without some assistance so I do not apologise for that. The canopy sections then fitted to the fuselage remarkably well with just a smear of filler to blend them in. At this stage I also attached the tail pieces. These took some care as there is no locating slot or lug, just the parts butting up against the fuselage. The final fuselage section is the turret base, which has an optional blank version, but the customer definitely wanted the turret so the details therein were painted and installed.

Next I put the wings together. The top and bottom halves of the wings do not line up perfectly, and a lot of sanding was needed to get seamless leading and trailing edges. Also, the instructions are very vague as to the lining up of the interior of the wheel bays, and a lot of trial fitting was needed to get it right. But eventually I had a pair of nicely finished wings. But fitting them to the fuselage was problematic. The fit is actually very good, but as with the tail there is no location engineering, just the edges of the wing parts against a flat area of the fuselage. This requires some gymnastics in gluing and setting. Also, I found that the starboard wing ended up at completely the wrong angle. The dihedral of the Anson is almost flat (only a couple of degrees) but the starboard wing was raised by about ten degrees which as a) wrong and b) completely out of kilter with the other wing. So I padded the top half of the wing with some strips of styrene sheet which gave the correct dihedral but needed some extensive filling afterwards. This is a shame because the "default" fit was actually spot on.

The engines are provided in resin, and are nice representations of the rotaries which turned out nicely with a little dry brushing. The engine shrouds are also resin. This gives them a nice realistic thin edge but it took a long time and not a few shredded nerves in getting them detached from their plugs and cleaned up. And in fact one of them did crack but fortunately it did not need a repair as the crack was invisible under paint. They were also tricky to install over the engines, which had to have their cylinder tops trimmed to get them on, although fortunately the trimming is not visible under the shroud.

I started the painting by spraying the masked cockpit and glass areas with interior green. This was followed by an overall coat of primer. I am not usually a big fan of pre-shading, but I did so on this plane because it has that distinctive lattice structure on the wings that would need to be highlighted. I started then by spraying the underside with Alclad aluminium to represent the silver painted underside of all early Ansons. I masked off and picked out the metal panels with dark aluminium to provide some contrast. I also applied a little weathering at this stage rather than later as I find this works better on Alclad. A little black oil was used to accentuate the lattice and ribs and give some streaks.

The underside was masked off and the whole upper surface sprayed with my own mix of Tamiya acrylics to represent RAF dark earth. This is a notoriously difficult colour to get right. The only paint I know that gets it completely correct is Humbrol 29, but I really don't get on with Humbrol Acrylics and I am not about to start converting to enamels at this stage. I then Blu Tack masked the camouflage pattern and sprayed over the RAF green. The whole plane got a couple of coats of Klear ready for decaling.
The customer has asked for a specific plane, MW-F from 321 (Dutch) squadron. No suitable decal set is available for this one so I made my own for the lettering and orange triangle, although I used the kit decals for insignia as far as is possible. The kit provides no stencils, but the Anson had very few anyway so I forgave it that one.
After more varnish, I then gave the whole plane an oil wash to bring out the few panel lines that exist, and manually applied subtle oil streaks elsewhere. After a couple of matt varnish coats I then applied a little panel bleaching using light grey to further highlight the lattice work and main panels. After removing the masks on the canopy and turret a little cleaning up was required where some primer had bled under the masks. This was partly my fault for not sealing the masks properly but in my defence, this is very tricky on curved canopy surfaces!
I was worried that fixing the undercarriage would be tricky since there are no real positive locators for the legs and there is a lot of weight to support. However to be fair the parts went into place very well but I made sure plenty of glue and drying time was applied and it all held up well.
With some more weathering, the final addition of the aerials, exhausts and a few other superstructure bits she was all done.
So in conclusion, this is a tough kit to build. It is quite capable of producing a stunning result, but is not for the faint hearted or anyone who is not used to working with resin. I am extremely pleased with the finished model, as is the customer (which is what matters, after all!) but it was not all smooth sailing. Unfortunately, the kit attempts to substitute plastic components for resin where it is just not necessary or practical, and this does cause some grief. But the end result is what matters, and an Anson in 1/48 scale is hard to beat as a showcase model.
www.bowemodels.com


Only someone loving planes can do this.
ReplyDeleteCheers !